Showing posts with label Ornella seed beads. Show all posts

Tuesday, June 4, 2013

MOP Brooch Progress

Shabby Vintage Bridal
Good morning, dear readers!
 
I finally got the foundation found on the Mother-of-Pearl brooch to work out to my satisfaction!
 
 
I am using Valdani Luxury Pearl Silk in S9 "Herb Garden" with silver-lined forest green Ornella seed beads for accents.  Future possible accents are what I'm debating on now.  I have some gorgeous Swarovski crystals and also some beautiful dyed green freshwater pearls.  My mom said she doesn't care what I use.  "Just make it pretty," was my only instruction from her.  So, what do you think?  Should I just use the seed beads or should I add another type of accent?  My only concern is that I do not want the accents to compete with the beauty of the brooch itself.
 
Well, I have towels to get out on the clothesline and lots of tatting to do.  Have a wonderful day & until tomorrow~
Happy Tatting!


Thursday, May 30, 2013

Little Golden Pendant

Shabby Vintage
Good morning, dear readers!
 
My tatting needles have been busy tatting more prototypes. Here is the golden pendant I am working on fleshing out this morning:
 
 
I have a gorgeous little carved brown cow lip shell button I may use for the center accent.  Then again, there is a sparkly bronze Swarovski rondell that would look nice, too.  I'll decide what to use for the center after I complete a couple more rounds.  Do you have any suggestions?
 
Be sure to leave a comment on Tuesday's post for your chance to win the Ecru Pendant Prototype!  The winner will be selected tomorrow morning early before our walk in the woods.  Well, I'm burning daylight and have oodles to do today.  Hope you day is full of tatting goodness & remember to leave your comment!  Until tomorrow~
Happy Tatting!


Wednesday, May 29, 2013

Sulky Chartreuse Experiment

Shabby Vintage
Good morning, dear readers!
 
I had another idea flash through my brain yesterday as Rosie Fey & I were walking in the Piney Woods.  After we made it back to the house, I pulled out some of the Sulky 12 wt. thread I've been tatting with lately and a few Ornella cream pearl seed beads.  This is where I am at now:
 
 
What do you think?  I may need to make some adjustments as the number of seed beads add quite a bit of weight to the piece.  You never know what I may decide to do.  We'll just see how this current round goes.
 
I have been eyeing a lovely golden shade of Valdani Luxury Pearl Silk and may have to play with it in a while.  What tatting projects are you working on, dear readers?  I'd love to hear what you're up to!
 
Don't forget to leave a comment on yesterday's blog post for your chance to win the Ecru Pendant Prototype!  I am off to the park for a walk with some friends before settling in the Atelier for the day.  Have a great day & until tomorrow~
Happy Tatting!


Wednesday, May 22, 2013

Playing Around

Shabby Vintage
Good evening, dear readers!
 
I have spent the day playing with various thread and bead combinations.  It is very helpful to the design process to test tat thread & bead combos.  Some beads are heavier than others and can cause your tatting to twist or pull.  Plus, I love to play with different color palettes.
 
 
Neutrals have always fascinated me with their understated elegance.  Pictured above is Valdani Luxury Pearl Silk in S514, "Wheat Husk".  I am test tatting a motif with silky brown satin Delica seed beads and cream pearl Ornella seed beads.  So far, so good.  I'm rather pleased with how the colors of the beads compliment the hand dyed Valdani silk.  I'll take some images of the motif when it is complete to share with you.
 
What color and bead combos do you like to use, dear readers?  I am always looking for new ideas to use in my work.  If you have a recommendation, please post it in the comments section.
 
The chicken enchiladas are done.  Time to take them out of the oven and eat supper.  Have a wonderful evening and until tomorrow~
Happy Tatting!


Monday, May 20, 2013

Disc Pearl Pendant

Shabby Vintage
Good morning, dear readers!
 
Just got Jim off to work for the day and thought I'd go ahead and do my blog post before I get busy with the day's activities.  I was sifting through my pearls this weekend and decided to do a little pendant with one of the gorgeous disc pearls I purchased several months back:
 
 
It was needle tatted with Valdani Luxury Pearl Silk in "Herb Garden" and is accented with silver-lined forest green Ornella seed beads and 3mm crystal AB Swarovski bicones, along with a little pinecone charm.
 
This is how the piece began:
 
 
I beaded around the disc pearl and securely knotted the thread before commencing tatting.
 
 
This is the first round.  It was inspired by a design I did a few years back using some handmade dichroic glass disc beads.  I personally prefer pearls, but the dichroic disc beads were lovely.  Wish I had some more of them.
 
Well, I had better get myself together for the busy day ahead.  Rosie Fey is scheduled to have her stitches removed and I can finally bathe her this evening.  Believe me, she needs it!!!  Jocelin and I have some shopping to do for her summer classes and I need to pick up more chicken feed.  May you have a wonderful day full of creativity & until tomorrow~
Happy Tatting!


Friday, May 10, 2013

New Sulky Thread Colors

Shabby Vintage
Good afternoon, dear readers!
 
Clean-up on aisle 6!!! 
Rosie Fey knocked over my hot pink rainbow seed beads & pearls this morning.  I am still picking & vacuuming up seed beads from the sculpted carpet in the Atelier.  Guess I'll finish that Pink Goodies Project this weekend.
 
My day did have a nice, bright spot.  The 12 wt. Sulky thread I ordered from Uncommon Thread came in!
 
 
The colors pictured above are: 1149- deep ecru, 1046- teal, 1230- dark teal, and 1332- deep chartreuse.  I LOVE the teals.  They look so good with the Ornella light cream and dark cream pearl seed beads I like to use.
 
This weekend is Mother's Day here in the States.  Jim & Jocie have something planned, but will not even give me a hint.  So long as I get to be with them, I'm good.  What are your plans this weekend, dear readers?  Other than enjoying Mother's Day, I plan to finish that pink piece and the lime pendant.  I may even tat a little bit with the new teal thread. 
 
Rosie Fey is asking to go on her afternoon walk, so I'll sign-off until next week.  Until Monday~
Happy Tatting!


Wednesday, May 8, 2013

Projects Galore

Shabby Vintage
Good afternoon, dear readers!
 
Rosie Fey is doing much better today.  Many thanks for your kind words of support.  She is sleeping at my feet but will probably be up soon- ready for an afternoon walk.
 
There are so many projects going on in the Atelier!!!  I have something special for tomorrow's blog post.  These are the materials that will be used:
 
 
A vintage 4-hole shell button, a new pewter charm that reads "I am the PINK in his world of camo", rainbow hot pink Czech seed beads, hot pink dyed freshwater pearls, Valdani Luxury Pearl Silk in "Roses" and Purely Silk thread in "Strawberry Pink".  What do you think this project will be?
 
Another project I'm working on is a pendant using Sulky Blendables 12 wt. thread in "Lime Sherbet" with Ornela cream pearl seed beads and Czech silver lined green seed beads.  This is the bare bones foundation:
 
 
This will be greatly fleshed out to make a frothy, frilly pendant.
 
And another little goody I have that Jim & Jocie gave me years ago is this pin:
 
 
My "Queen Mother" pin.  I have put this on top of several different tatted backgrounds and worn it on jackets and dresses for Mother's Day each year.  I plan to do a new background for it this year.
 
Here is my challenge to you, dear readers:  go through your little boxes of treasures and find something fun to create with.  Leave a comment and tell me what goodies you've found to play with.  I love to hear what you are up to, you know!
 
Well, Rosie Fey is stirring and will be requiring my full attention shortly.  May you have a wonderful day & until tomorrow~
Happy Tatting!


Thursday, May 2, 2013

A Dark Ecru Motif In Progress

Shabby Vintage
Good afternoon, dear readers!
I have been busy with housework today, but did manage to sneak in a little tatting time this morning.  For some reason, the dark ecru 12wt. Sulky thread was beckoning me to do something with it.
 
 
I really like to use the Ornella pearl seed beads with this color.  At the moment, I am debating which element to add to the center and how I want to expand the motif.
 
I have a couple more pieces ready to have images taken, but the weather has not co-operated.  It has been steadily drizzling for the past few hours.  Perhaps I will be able to get images tomorrow.
 
On the agenda for the rest of the afternoon and evening is cleaning a few vintage accents to feature on the blog next week.  I plan to talk Jim into going to pick up something for supper as I am not in the mood to cook.  Well, I need to check the vintage stashes in the Atelier and make my selections.  Have a wonderful evening & until tomorrow~
Happy Tatting!


Monday, March 4, 2013

Trinity Foundation

Celtic Faire
Good morning, dear readers!
Hope you had a great weekend.  Ours was busy and full of puppy mischief. 
 
Here is the basic foundation of 3 ICRs that will be used for this week's tatted items:
 
 
It is tatted with a size 8 needle, Valdani Luxury Pearl Silk in S9 (Herb Garden) and is accented with light creamy pearl Ornella Czech seed beads and 3 Swarovski 3mm bicones in a lovely Spring green color.
 
To begin with, string 9 seed beads onto silk and tat the 3 ICRs with the following counts:
First ICR 5 very small - 5 very small - 4 - (slide 1 Swarovski onto needle then finish forming picot with 3 seed beads) 4 very small - 10 CL
Second ICR 10 very small - 5 - (slide 1 Swarovski bicone onto needle then finish forming picot with 3 seed beads) 5 very small - 10 CL
Third ICR 10 very small - 4 - (slide 1 Swarovski onto needle then finish forming picot with 3 seed beads) 4 very small - 5 very small - 5 very small - 5 CL
Bring both ends of silk thread to front and tie knot, leaving ends to be worked in later.
 
I have a couple of projects lined up using this base that I hope you'll like!
 
Well, Rosie Fey LOVES the Piney Woods!!!  We went for several walks this weekend and she explored and sniffed until she was worn out.  She was so funny looking for squirrels that were running through the trees overhead.  She'll eventually figure out that she needs to look up, but she was on high alert, nonetheless.
 
 
After taking the kid to school and doing a quick grocery store run, I plan to take Rosie for a romp in the woods then get down to work in the Atelier.  Let's hope Rosie is ready for a good, long nap after her romp!  Until tomorrow~
Happy Tatting!


Thursday, February 7, 2013

Playing Around

Romantique
Good morning, dear readers!
It is yet another foggy morning in the Piney Woods.  I must say, it really annoys me when people do not turn on their headlights in this weather.  Especially when they are driving a gray, silver or white vehicle- you can hardly see them.
 
I spent yesterday playing around with a few projects.  During the afternoon, I tweaked the counts of the piece that will be the FREE pattern for this month.  It's almost ready.  The evening consisted of playing with some new Valdani Luxury Pearl Silk.
 
 
This is a Winter Blossom motif tatted with S514 "Wheat Husk" Valdani Luxury Pearl Silk and is accented with dark cream pearl Ornella seed beads.  This piece is just the foundation to a larger idea I had.  If it turns out, it will be part of my upcoming Olde West collection.
 
This morning will be filled with hand embroidery design, FREE pattern tweaking and more tatting on the pictured prototype.  Hope your day is full of tatting goodness!  Until tomorrow~
Happy Tatting!


Friday, January 18, 2013

WB Motif No. 3 Outer Rounds

Winter Blossoms
Good afternoon, dear readers!
I actually got some tatting done this morning.  Harry, our daughter's dog, has decided it is now his job to lay at my feet while I tat.  He has been a velcro puppy since Lily Fey's passing.  Here are the completed outer rounds of the Winter Blossom Motif No. 3 pendant:
 
 
Both chain rounds have a count of 25 stitches.  You will need 20 seed beads.  DO NOT ADD BEADS TO THREAD YET.
Run tatting needle through small picot to the left of any bead set previously tatted.  Pick up 1 seed bead with needle, CH 25 CL + to corresponding picot on next previously tatted CH.  Continue around pendant.
For the second round, cut a length of silk as you will be weaving the working thread through the CHs you just tatted.  Run needle through picot to the right of the bead set, pick up 1 seed bead.  CH 25 CL + to corresponding picot on the next previously tatted CH.  Pull the working thread through and continue around the pendant motif. 
*Helpful Hint*- I thread the other thread end with another needle when I work with a long length of thread.  It helps to keep the thread from becoming tangled as easily and gives you better control of your work.
 
I will be adding the center accents this afternoon and may do a rare weekend blogpost.  I am debating whether to add a cultured pearl or another smaller carved MOP antique button.  What will I do?  Hmmm...
 
Many thanks, again, for all of the kind words concerning the loss of my dear Lily Fey.  You have made a difficult time easier.
 
Well, I am going to get my plant nursery & grocery store lists together & head out to run errands.  Have a wonderful weekend and until later~
Happy Tatting! 


Tuesday, January 15, 2013

WB Motif No. 3 Accent Round

Winter Blossoms
Good morning, dear readers!
It is icy and nasty in the Piney Woods this morning.  I had a horrible time getting decent images to use in today's post.  Here is the next part of the FREE Winter Blossom Motif No. 3 pattern:
 
 
To tat this round, you will need 40 seed beads.  Begin by stringing 30 seed beads onto silk.  Run tatting needle through any picot joining between previously tatted rings.  The entire accent round has the same counts.  Simply repeat around motif.  Pick up 1 seed bead with needle, CH 8 - with 3 seed beads 8 CL + to next - between previously tatted Rs.  Continue around motif.  Join last CH at base of first, pull threads to back of motif.  Place a small dot of jeweler's adhesive on knot then cut.
The next round will be on tomorrow's post.
 
I did another Winter Blossom Motif No. 4 last night using Valdani Luxury Pearl Silk in S9 (Herb Garden):
 
 
This was the best I could do considering our weather conditions.  It is sleeting at the moment.  We are fortunate as this only happens maybe 2 or 3 times a year.  I'm hoping that the sleet will let up enough later so I can take a stroll in the woods with my camera.  Who knows when artistic inspiration will strike?
 
Well, I am ready for another cup of hot cocoa.  Have a wonderful day & until tomorrow~
Happy Tatting!


Monday, January 14, 2013

Winter Blossom Motif No. 3 Part One

Winter Blossoms
Good morning, dear readers!
 
I had a great weekend full of tatting.  How did yours go?
Well, without further ado, here is the FREE pattern to the foundation for Winter Blossom Motif No. 3-
(the rest of the pattern will follow in subsequent posts)
 
 
This pendant is tatted with Valdani Luxury Pearl Silk (S204) with grey rainbow Ornella seed beads onto an antique MOP button.  The button is 5/8" across and has 4 holes.  I used a size 8 tatting needle.
To begin, string 30 seed beads on to silk then tat as follows:
R 6 - 6 + to button 6 - 6 CL RW
CH 9 sm- 4 -(with 3 seed beads) 4 sm- 9 CL RW
R 6 + 6 + to button same as before 6 - 6 CL RW
CH 9 sm- 4 - (with 3 seed beads) 4 sm - 9 CL RW
R 6 + 6 + to next hole in button 6 - 6 CL RW
CH 9 sm- 4 - with 3 seed beads) 4 sm- 9 CL RW
R 6 + 6 + to same button hole as before 6 - 6 CL RW
CH 9 sm- 4 - (with 3 seed beads) 4 sm- 9 CL RW
R 6+ 12 - 6 CL RW
CH 9 sm- 4 - (with 3 seed beads) 4 sm- 9 CL RW
R 6 + 6 + to next hole in button 6 - 6 CL RW
CH 9 sm- 4 - (with 3 seed beads) 4 sm- 9 CL RW
R 6 + 6 + to same hole as before 6 - 6 CL RW
CH 9 sm- 4 - (with 3 seed beads) 4 sm- 9 CL RW
R 6 + 6 + to next hole 6 - 6 CL RW
CH 9 sm- 4 - (with 3 seed beads) 4 sm- 9 CL RW
R 6 + 6 + to same hole as before 6 - 6 CL RW
CH 9 sm- 4 - (with 3 seed beads) 4 sm- 9 CL RW
R 6 + 12 + (to - of first R) 6 CL RW
CH 9 sm- 4 - (with 3 seed beads) 4 sm- 9 CL RW
Join last CH to base of first R tatted.  Tie, add a small dot of jeweler's adhesive & cut.
 
I was not satisfied with the second round and am going to work out the counts better today.  I'll have the next round of the FREE Winter Blossom Motif No. 3 up tomorrow morning.
 
Let me show you what distracted me this weekend from finishing the second round-
 
 
Sometimes, the thread calls and I just cannot resist.  I played with different counts on the Winter Blossom Motif No.4 on Saturday & Sunday.  Couldn't help myself.  Oh, here is a image of the blue one for your viewing pleasure-
 
 
Well, I had better get busy.  It is cold down here this morning and I have to scrape frost off the Jeep windshield before taking the kid to school.  We even have a bit of ice about.  Times like this make me so glad I have my little Jeep to play in!  Have a great day & let's hope I get off my duff and work out those next counts.  Until tomorrow
Happy Tatting!


Friday, January 11, 2013

Winter Blossom Motif No. 4

Winter Blossoms
Good afternoon, dear readers!
I finished the Winter Blossom Motif No. 4 last night.
 
 
It makes a nice pendant, doesn't it?!?  I am considering doing a few of these in different threads with assorted accent beads for the Atelier Shoppe.  What do you think?  Several folks have asked me to do an Etsy store, but I am not so sure.  I know some people who have had their original work ripped off from their Etsy store listings.  Not sure I care to have that headache- I'm VERY protective of my work.  Especially OOAK couture pieces!  Do any of you, dear readers, have an Etsy store or insights you'd care to share?
 
The FREE pattern is still on my to do list.  I was not happy with the counts on the second round and have ripped them out & will re-do it this weekend.  Please check back early Monday morning for the next FREE pattern post.  I think you'll like the design.
 
I don't know about y'all, but I am so ready for the weekend!!!  Jim, Jocie & I plan to spend some quality time at home.  Things have been very hectic and stressful this new year and we need to have a quiet family weekend.  I plan to tat to my heart's content, cook a huge batch of venison chili, and finish a couple of hand embroidery designs I've been working on.  What are your plans?  Anything interesting???
 
Well, I'm off to the grocery store for the necessities.  Have a wonderful weekend and be sure to look for the FREE Winter Blossom pendant pattern on Monday's post.  Until then~
Happy Tatting!


Thursday, January 10, 2013

Another Variation

Winter Blossoms
Good afternoon, dear readers!
 
I had a productive time in the tatting chair last night whilst watching Amish Mafia on the Discovery Channel.  After tatting my mom's birthday pendant, I kept having visions of an adaptation.  So, I picked up a spool of Sulky Blendables 12 wt. quilting cotton in color 4025 "Hydrangea", added some silver lined lilac rocailles and cream pearl Ornella seed beads and tatted this variation:
 
 
I'm not finished with it yet, as there are a couple more rounds in my head that I need to tat.  So... what do you think?  I think this makes a nice Winter Blossom motif 3 (or is it 4).
 
Well, I have lots of errands to take care of this afternoon.  Have a great day & until tomorrow~
Happy Tatting!


Wednesday, November 28, 2012

Final Counts for Bracelet

Good morning, dear readers!
Here are the final counts for the bracelet:
 
 
Begin by running needle through 8 seed beads and + to -.
ALL of the chains on this side of the bracelet begin with picking up 1 seed bead with the needle.
CH 11 - (with 3 seed beads) 11 CL + to next - and pull a long length of silk through.  Note that it is easier to use a second needle on the working thread end to help with weaving the chains through.
Repeat these counts 2 more times, weaving as you go,  then
CH 13 - (with 3 seed beads) 13 CL + to next -, weaving as you go.
Continue along length of bracelet until you reach the last 3 Rs.
Repeat the CH 11 counts and finish by running the needle through 8 seed beads.  Tie & add a dot of jeweler's adhesive before cutting.
Add a clasp with jumprings.
 
I did not realize that the clasp I planned to use on this bracelet was damaged.  It does not close and hold securely.  After digging through my findings, I could not find another clasp of similar size- bummer.  All of the other clasps I have are either way too small or too large.  I'll pick up a package of clasps the next time I'm at the craft store and take an image so you can see the final bracelet.
 
Well, I have a fun day planned.  It is time to clean out and defrost the deep freezer.  Oh, joy.  Still, it is a very necessary chore.  Let's hope it goes quickly and I can get back to my tatting.  There are a couple of projects I'm working on, so perhaps I'll have something nice to share soon.  Have a great day & until tomorrow~
Happy Tatting!


Tuesday, November 27, 2012

Next Step for Bracelet

Good morning!
Yesterday was rather busy, but at least I am somewhat caught up on laundry.  When Jim & Jocie are home, it seems as though the dirty clothes piles heap up.  Oh, well...
 
This is the next step for the bracelet:
 
Just a simple accent round of chains with beads that flow around the previously tatted rings.
 
 
The number of beads you will need to string on the silk depends upon the number of rings and chains you've used for your bracelet foundation.
Run tatting needle through picot of first R.
Add 1 seed bead to needle, then tat as follows:
CH 7 - (with 3 seed beads) 7 CL + to next -, repeat 3 times.
CH 9 - (with 3 seed beads) 9 CL + to next -, continue until coming to last 3 Rs, then
CH 7 - (with 3 seed beads) 7 CL + to last -.
DO NOT TIE & CUT!!!
The continuation of this pattern will be posted tomorrow!
 
 
Hope you are enjoying the bracelet pattern.  I've had a good time playing.
 
I'm  working on cleaning some of my recent acquisitions- getting them ready for embellishment.  The cameos look so much better now that I've cleaned the mountings and the cameos themselves.  Additionally, I've been cleaning up a few vintage brooches and MOP buttons.  After I post all of the parts of the bracelet project, I'll share some new eyecandy with you!
 
My hot cocoa is waiting and I need to clean the Atelier before doing more work.  Have a great day & until Wednesday~
Happy Tatting!


Monday, November 26, 2012

Bracelet Foundation FREE Pattern

Good morning, dear readers!
After an enjoyable holiday, I am back at work in the Atelier.  Several folks have requested a simple bracelet pattern with the interwoven chains and I decided to give it a go.  The following is a basic foundation for a bracelet that can be adjusted for various wrist sizes and incorporates (in subsequent posts) interwoven chains.  I tatted this using Valdani Luxury Pearl Silk in color S39 "Forest Greens" with "rainbow grey" size 11/0 Ornella seed beads with a size 8 tatting needle.
 
 
String 99 seed beads onto silk and tat as follows:
R 5 - 5 - (with 3 seed beds) 5 - 5 CL RW
CH 7 - (with 3 seed beads) 7 CL RW
R 5 + 5 - (with 3 seed beads) 5 - 5 CL RW
CH 7 - (with 3 seed beads) 7 CL RW
R 5 + 5 - (with 3 seed beads) 5 - 5 CL RW
CH 7 - (with 3 seed beads) 7 CL RW
R 7 + 7 - (with 3 seed beads) 7 - 7 CL RW
CH 9 - (with 3 seed beads) 9 CL RW
 
NOTE:  I tatted a total of 11 Rs with the 7 count to get the size that I needed to go around my wrist.  This is where you can adjust the length that you will need.  Be advised, more steps are going to be posted this week.  When lengthening or shortening, keep in mind that another round will be added along with a metal clasp finding.  These are important to keep in mind when adapting this pattern to your specific needs.
 
After tatting the number of 7 count Rs,
CH 7 - (with 3 seed beads) 7 CL RW
and finish with 3 Rs with 5 counts as listed at beginning of pattern.  Tie & cut, hide ends.  Be sure to place a dot of jeweler's adhesive to silk before cutting.


Here is a closer view of the foundation. 
 
Well, I am going to be busy catching up on some household chores today since Jim will be back at work and Jocie, at school.  I'll get the next step on the bracelet ready for posting tomorrow morning.  Have a great day and until tomorrow~
Happy Tatting!


Wednesday, November 21, 2012

FREE Pendant Foundation Pattern

Good morning, dear readers!
 
I played around yesterday with some Valdani Luxury Pearl Silk and thought I'd share the basic foundation of the pendant I'm tatting:
 
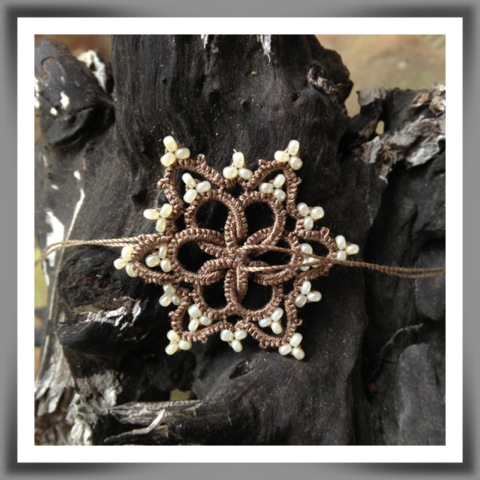
For this foundation you will need: a size 8 tatting needle, Valdani Luxury Pearl Silk in S592, and 30 size 11/0 Ornela seed beads in "rainbow grey".
 
String all seed beads onto silk and tat as follows:
R 7-7 - (with 3 seed beads) 7-7 CL RW
CH 7 followed by 5 graduated -s 7 CL RW
R 7+7- (with 3 seed beads) 7-7 CL RW
CH 7 followed by 5 graduated -s 7 CL RW
R7+7- (with 3 seed beads) 7-7 CL RW
CH 11 followed by 7 graduated -s 11 CL RW
R 11+11- (with 3 seed beads) 11-11 CL RW
CH 11 followed by 7 graduated -s 11 CL RW
R11+11- (with 3 seed beads) 11-11 CL RW
CH 11 followed by 7 graduated -s 11 CL RW
R 7+7- (with 3 seed beads) 7-7 CL RW
CH 7 followed by 5 graduated -s 7 CL RW
R 7+7- (with 3 seed beads) 7-7 CL RW
CH 7 followed by 5 graduated -s 7 CL RW
R7+7- (with 3 seed beads_ 7-7 CL RW
CH 11 followed by 7 graduated -s 11 CL RW
R 11+11- (with 3 seed beads) 11-11 CL RW
CH 11 followed by 7 graduated -s 11 CL RW
R 11+11- (with 3 seed beads) 11 + (to first - of first R) 11 CL RW
CH 11 followed by 7 graduated -s 11 CL RW, + to base of first R & CH.  Tie & cut, hide ends.
 
NOTE: before you cut the silk, place a small dot of jeweler's adhesive to secure knot.
 
This is a good basic foundation that can be built upon in numerous ways.  I'll show you the enhancements I make to it as I go.  Use your imagination and add beading, more rounds of tatting, etc.
 
This color of the Valdani Luxury Pearl Silk (S592) reminds me of the Mexican petunias that are blooming like crazy in my front yard.  Here is the image I took of them a few days ago:
 
When the petunias first open, they are darker and become lighter as the day progresses.  S592 is the closest color I have to them.
 
Well, I'm ready for my hot cocoa.  Have a fantastic day & until tomorrow~
Happy Tatting!


Sunday, September 30, 2012

Fairy Queen Pendant

Here she is:
 
 
And she took almost a full spool of Valdani Luxury Pearl Silk to complete!
Here is another image that will give you a better idea of the more dimensional center:
 
 
I went back and added 1 gunmetal seed bead in between the Swarovski pearls in the center.  This gives the pendant more stability as the silk is very soft and flexible.  The outer two rounds are tatted with the same counts and are joined between the 1st & 2nd, and 2nd & 3rd seed beads of the inner accent rounds.  Here is an image of the 1st complete outer round:
 
 
Run needle through (join at) junction of 1st & 2nd seed bead, CH 21 CL + at corresponding spot on next CH, (skipping the inner accent round with the seed bead, pearl, seed bead focal accent- these are meant to be left free of ornamentation unless you choose to add more rounds to the pendant) continue around motif.  Tat in the same manner around the motif between the 2nd & 3rd seed beads, weaving the CHs as you go.  Tie & cut, hide ends and add a jump ring.  NOTE:  I use a small dot of jeweler's adhesive to the silk before I cut it as it will sometimes slip out of a finishing knot.
 
I hope you have enjoyed this pattern and be sure to stay tuned to the blog this week as I plan to post another FREE pattern on Tuesday!  It will be tatted in a vibrant hunter orange Valdani Luxury Pearl Silk and feature some fabulous red/orange Swarovski bicones.  Plus, if I am blessed with abundant tatting mojo, there may be yet another pattern Friday!!!  Yes, I've been on a roll this weekend.  And not just with tatting.  I've been beading and working on making foundations for my tatting.  This is a necklace I strung Saturday:
 
 
The necklace is made of grey peacock Ornella seed beads, lavender peacock dyed freshwater pearls, and purple Austrian crystal rondells.  It has a lovely filigree clasp.  The glare was such that I couldn't get a good image with the clasp- sorry.  I think this necklace needs to be enhanced with tatting done in "Forgotten Lavender" Valdani Luxury Pearl Silk.  Should I add some more seed beads to the tatting accents?  What do you think?
 
Well, I have got to run.  The Saints are playing the Packers this afternoon and I have to get game food prepared.  Comfort food is more like it- I don't hold out much hope for my Saints in this one.  They're not doing too well this season and the Packers are a tough team.  May you have a wonderful weekend & until Monday~
Happy Tatting!